Sunday, 27 September 2015

Sep 27th Catton Park

Puffball
I have returned to Catton Park this morning for another crack in my search for an earthstar. Unfortunately, it was another failed attempt and I am wondering if they exist here at all. I won't give up though, I may return for a third search next week.

It was actually a busy day in the park today as it turned out to be some kind of special event going on with tents, stalls and other attractions covering the most of the field. I kept my search in the woods away from it all and dispite not finding an earthstar, I did find some other fungi. I found a few new toadstools that I didn't see last week. There were puffballs, bonnets, yellow stagshorns, parasols and a few others that I still haven't identified yet. If someone is reading this and are experts on fungi, let me know what they are, as I am not an expert.

An undeveloped Shaggy Parasol
Shaggy Parasols
Rosy Bonnet (Possibly)
Clouded Funnel
Yellow Stagshorn
Pearly Parachute (possibly)
More Rosy Bonnets (possibly)
Some tiny bonnet-like fungi (I think)

Friday, 25 September 2015

How To Draw: Fungi

Triggered by a spell of wet weather, toadstools and mushrooms are emerging from the ground. Like an apple on an apple tree, toadstools and mushrooms are the fruit of something much bigger. The 'tree' in this case is an underground network of powdery threads called mycelium, the fungus itself. The world of fungi is an interesting science and without fungi, we would in a world of trouble as they decompose dead matter into compost and nutrients for plants to grow from. They are a vital part of the ecosystem and are also a great subject to draw. Drawing fungi is easy and anyone can draw the shape of a toadstool well enough, and with hundreds of species to choose from, it is in the detail in your drawing that can help identify them.

Stage One
The most familiar type of fungi are the ones that produce toadstools and mushrooms (which are the same thing by the way). Drawing one is made up of two to three structures. The top part is the cap and can be drawn with either a circle or semi-circle. The second part is the stem which is drawn as a rectangle here, but can vary in length, thickness and could have a bend or be tilted depending on the species and speciman you are drawing. The third part, a 'skirt' under the cap, is optional and is just a square shape. Also optional when drawing is the gills under the cap, which are drawn as lines with a gap between each line.


Stage Two
Next, improve the shape and structure of your drawing so it looks like the speciman you are drawing. In other words, add any bumps and cracks to your toadstool. Some toadstools have scales or flakes on the cap. These are simple enough to draw, just round or uneven shapes.


Stage Three


Redraw your toadstool in pen. Rub out the pencil marks afterwards.


Stage Four


Colour in your toadstool. My toadstool is a fly agaric, a poisonous fungi with white scales on a bright red cap, often pictured in fairytail stories that fairies sit on.


Stage One


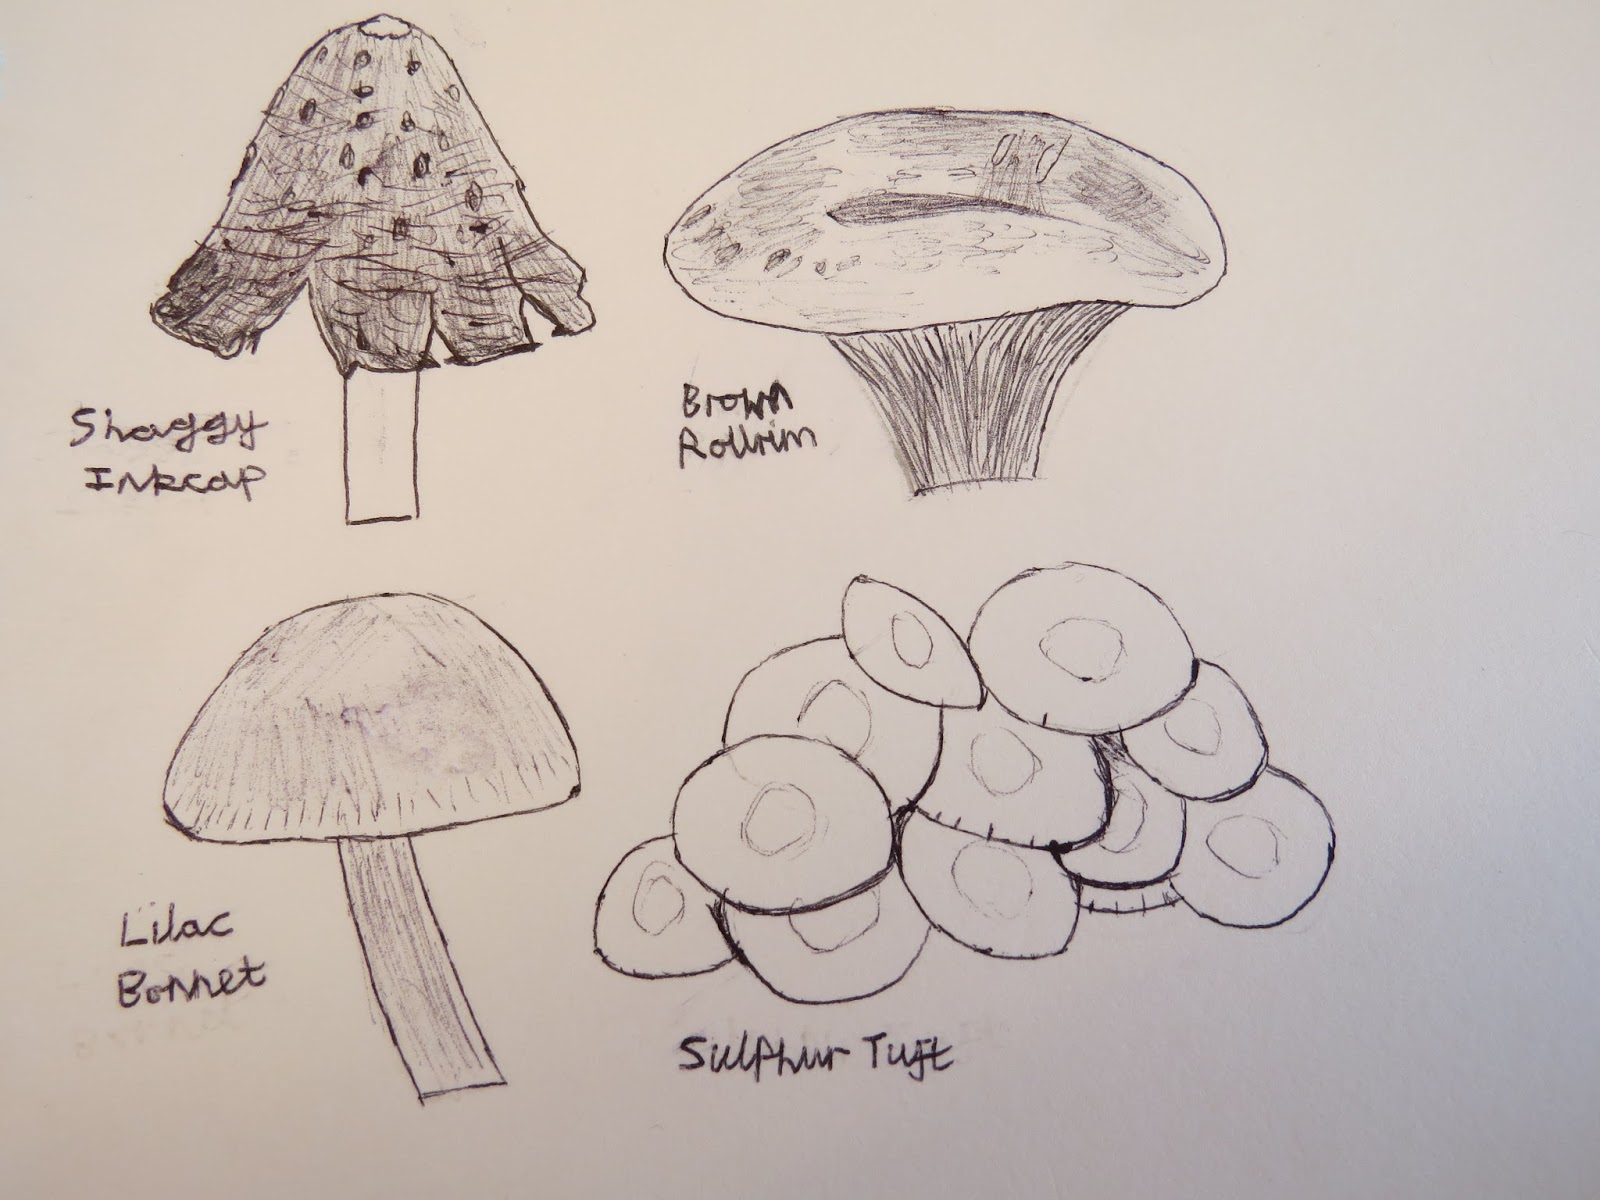
Toadstools come in many shapes and colours and can form as clusters. My next set of drawings demonstrate other methods of such shapes, delicate colours and clustering.

The shaggy inkcap is drawn as a bell-shape attached to a stem. The brown rollrim has a dip in the centre of the cap and the gills are exposed. The dip is created with a circular mark and the stem is widened near the top for the gills. Use my stage by stage method I used for my fly agaric for the lilac bonnet, while the sulphur tuft is created with circles on top of more circles.


Stage Two
I've shaded in the caps of all but the sulphur tuft. The shaggy inkcap had parts of its bell shape broken off, so I drew angular shaped lines and missed parts of the bell out. Scales were also added to the inkcap. The dip on the top of the rollrim was shaded more so along the edge than the rest of the cap with a bit of a smudging using my finger. The gills were simply downward lines with slight gaps in between. My lilac bonnet was shaded and smudged slightly with my finger with lines added to the edge of the cap and to the stem. In the centre of each cap of my sulphur tuft, I draw a circle to mark out the orange part of the cap. 


Stage Three
 Redraw and shade in with your pen. For my shaggy inkcap, the lower half of the cap is darker as if stained in ink, while the upper half is lighter. For my rollrim, I took great care with the shading. The dip was shaded in along the dip and I gave it a little smudge with my finger towards the centre with a lot of care. Great care is also needed while lightly shading in the lilac bonnet. You can rub out any mistakes with an eraser, but only if the ink is still wet. You do not need to press hard onto the page with your pen when you are shading lightly. The sulphur tuft only needs a bit of shading along the edges to add dimension to the drawing and you can add chinks to the edging of each cap.


Stage Four

Colour in each drawing. Grey for the shaggy inkcap, yellow and brown layers for the rollrim, pink with brown highlights to the lilac bonnet (which I partially rubbed out with an eraser to lighten the colour) and yellow with orange centres for the sulphur tuft.


Drawing Stage
Fungi also come in other shapes and forms besides caps and stems. Bracket fungi grow on tree trunks, like my birch polypore (left) and are drawn as a round-ish shape for the bracket with a small semi-circle underneath (the stem) and then draw the tree it is attached to. Puffballs (like the one at the bottom) is just a round shape which is sometimes attached to a stem. Then you have unusual shaped fungi such as the orange peel fungus (right) which is drawn as a wobbly blob shape with some part of the edging concaved inwards and a dark centre. While fungi like the yellow stagshorn (bottom right) are thin twig-like shapes.


Pen Stage


Redraw in pen and shade in if needed.


Colour Stage


 Finally colour them in. I used bright orange for the orange peel fungus, but lighter orange for the edging, bright yellow for the stagshorn, a light layer of yellow and orange for the birch polypore with grey, brown and green for the tree trunk, while the puffball is highlighted with yellow and grey.


Another fun way to ID fungi is to take off the cap of a toadstool and place it gill downwards onto a piece of paper. Leave it for several hours for the spores (seeds of a fungus) to drop. The result should be a print and as each toadstool have different coloured spores, the prints should also be in different colours.

I hope I have inspired you to go out and look for fungi for yourself, while drawing them in their many shapes, sizes, colours and textures. You will be a fun-guy if you do (sorry couldn't resist). The best thing about fungi is that you can find them anywhere. From the park to a woodland, all you need to do is visit the next day after a night of rain.

Wednesday, 23 September 2015

Sep 23rd Strumpshaw Fen

Chinese Water Deer
It was quite an eventful morning at Strumpshaw today. Before setting off for my early walk to Fen Hide, I had a quick peek outside Reception Hide with a Chinese water deer grazing closeby. This was a female as her tusks were barely showing unlike a males and her fur was in good condition with her head looking like a teddy bear freshly bought from a toy store.

Shaggy Inkcaps
Signs of autumn was now showing everywhere you look. By a picnic bench, several shaggy inkcap toadstools have appeared during my absence since last week. Some of them were fully developed with black ink dripping from the edges. Spider webs covered every bush, tree and man-made construction on the reserve, looking like amazing works of art. The perfect early light of a September morning glistens on these silky patterns brilliantly, revealing every thread of spider silk in great detail. A few spiders were still building a new web, while others sat in the middle waiting for their next victim to fly into their death trap.

Spider web
Orb-web Spider
Another Orb-web Spider
Guelder Rose berries and autumn colours
From Fen Hide, a kingfisher made a brief visit and was thinking about landing on the closest perch in front of the hide before backing away. The sound of bearded tits pinging alerted me to their presence and I managed to spot one fly into the reeds. I also saw stock doves and a snipe flying by.

Mute Swan
Cormorant and Canada Geese
Kingfisher and Mute Swan
Back at Reception Hide, the same Chinese water deer made a few more appearances as did a kingfisher, which kept landing in front of the reedy islands. A water rail made a quick low flight over the front of the hide before vanishing behind a section of reeds and a pair of grey wagtails showed up close to the hide, but were moving a lot as if to avoid my camera, making me seem slow in comparison. There were a few birds of prey around today too with sightings of a kestrel, hobby and a marsh harrier.
Grey Heron
Marsh Harrier
Hobby

Otter
Inside the hide, people were asking my colleague about otters and at that moment, I spot one outside. You couldn't make it up! The thing was though, this otter was playing hide and seek with us, making us wait as it vanishes behind reedbeds down hidden channels and coves. A crowd was building as the visitors patiently waited for it to come out into the open again. Everyone managed to see it in the end between dives as it was clearly hunting. It was quite difficult to photograph and I ended up with shots of its tail and a hump of its back, appearing like a mini Loch Ness monster. Some of the visitors and my colleague said that they can see a second otter with it, more likely to be a cub, which I couldn't see myself. While waiting for the otter to show up again during one of its moments of hiding, the kingfisher reappeared by the islands and so the visitors were able to see both before even setting out on their walks around the reserve. They had me to thank for finding them for them.
Nessie? No, its the otter again!

Tuesday, 22 September 2015

Sep 22nd Cley

A lot to see at Cley from the hides
September is usually a good time to visit Cley. In the past I had seen great migrants including a Wilson's phalarope in 2013. Today, however, there wasn't anything rare or unusual, but that doesn't mean we didn't see anything at all. There were plenty of birds out on the pools this morning, just they were mainly black-tailed godwits, lapwings, wigeon, ruff, redshank, shoveler, teal and a few greenshanks. The godwits were now losing the rust red plumage that they used for the breeding season and were now a duller grey-brown. Their long pink bills probed the mud beneath the water of the pools, feeding in a large group close to the hide. Everything else was a bit photo shy and were just out of range.

Wigeon
Ruff
Redshank
Black-tailed Godwit
Shoveler
Teal
Gadwall
Greenshanks
Female Sparrowhawk
When we thought this was all we were going to see today, the waders and ducks were starting to get restless and were calling loudly and flying around together in large flocks. A predator was somewhere nearby watching them, but where? Inside one of the hides we visited, there was a commotion among the other birders, as they along with my mum had found a sparrowhawk sitting on a post adjacent to the front of the hide. At the same time, I had found a different predator, a kestrel hovering nearby from where the sparrowhawk was. Two birds of prey in the same place together. They were both females and there was a brief catfight as the kestrel dive bombed the hawk, which just sat there without flinching.

Kestrel
Kestrel hovering above the Sparrowhawk
Godwits forced up by the two birds of prey
Kestrel
The two birds continued to excite everyone watching them in the hide and we soon witnessed something extraordinary between them. The kestrel came to a gate to the left of our hide for a break from hunting and conflicting the sparrowhawk. Then out of nowhere, the sparrowhawk arrived to the same gate and sat metres from her. There was no conflict, just a few moments of peace between the two birds before parting ways. I have never seen a kestrel and a sparrowhawk together without any conflict before! Moments after the two seperated from the gate, a heron seemed jealous and wanted its moment of admiration on the gate.

Kestrel and Sparrowhawk together!!
This heron wanted its turn on the gate
Goldfinches
After lunch, I went for a short walk along a wire fence on the beach. Wheatear often show up around here at this time of year as they stop over while on their migration south and often pose on the fence posts. I was certain I had seen one during my short walk, but the bird had flown off before I could get a clearer look of it. There were many other birds on and around this fence as I came across a charm of goldfinches, a few meadow pipits and a rarther tame starling that allowed me to get close to it. Common birds (though most of them are sadly in decline), but good to see all the same.
Juvenile Goldfinch
Meadow Pipit
Starling