Since my close encounter with a short-eared owl at Strumpshaw on Wednesday, I have been in the mood to draw some owls for you all for this week's How To Draw. Owls are charasmatic birds that many people love. Their round faces that resemble satellite dishes, their soft feathers and their big staring eyes not only make them appealing to us, but are also what makes them successful as silent nocturnal hunters that are able to locate their prey in the dark. I love owls and I think they are great subjects to draw thanks to these unique features that they possess. But they can be tricky to draw and it takes a lot of time, patience and practice to get them just right.
 |
| Stage One |
To draw an owl, you need to draw a circle for the head and an oval for the body that is pointed slightly at the bottom end. I will be drawing a barn owl in this demonstration.
 |
| Stage Two |
Using these two shapes, I now divide them further with other shapes. Each shape represents different areas of the plumage that stands out with a different pattern on the bird's feathers. It is best to work from wingtip upwards before tackling the head, don't forget to draw the owl's talons along the way. To draw the head, I start at the back of the neck, going up and round to the otherside. As you go along, start marking out the distance between the head's outline and where you want the face, then draw a neat circle that is slightly dipped downwards at the top.
 |
| Stage Three |
Within each shape, mark out the pattern. The patterns are usually made up of tiny circles, tiny black dots and patches of shading. Shade in the talons and the perch the owl is sitting on. Inside the face, draw the bill (an upside down teardrop-shape) near the bottom half of the circle. From either side of the bill, draw a thin line sprouting out from the top of the bill, curving towards the nearest edge of the circle like an insect's antenae. A few inches below these lines, add a smaller darker line. With these lines you can work out where to position the eyes, which are shaded circles.
 |
| Stage Four |
Redraw your owl in pen one area at a time, adding and shading the pattern in. Working one area at a time, from bottom to top helps with any readjustments you have with the pattern and body shape in general. Under the owl's 'chin' and within the owl's face, I very, very lightly shade in the shadows and textures. I barely press onto the paper with my pen when shading this lightly.
 |
| Stage Five |
Finally, colour in your owl. For my barn owl, I used yellow and orange as a base colour, then grey and lastly, a light layering of black as a highlight on the grey areas.
 |
| Basic Shape Stage |
Owls come in many sizes and some have 'ear' tufts (which are just tufts of feathers). My next drawings shows you how to draw our smallest owl, the little owl, and an owl I still have on my wish list, the long-eared owl. Like my barn owl, you need to draw a circle for the head and an oval for the body for both of these owls. On the long-eared owl, add two small ovals for the 'ear' tufts at the top of its head and two more for the talons.
 |
| Pencil Stage |
Divide the body up as before, shade in the patterns. You can create shapes to position the features inside the face.
 |
| Little Owl and Long-eared Owl |
Redraw them in pen and colour them in. The little owl is brown with a light layer of orange and grey. The eyes are yellow. Avoid colouring over the spots. The long-eared owl is orange and brown with orange eyes.
 |
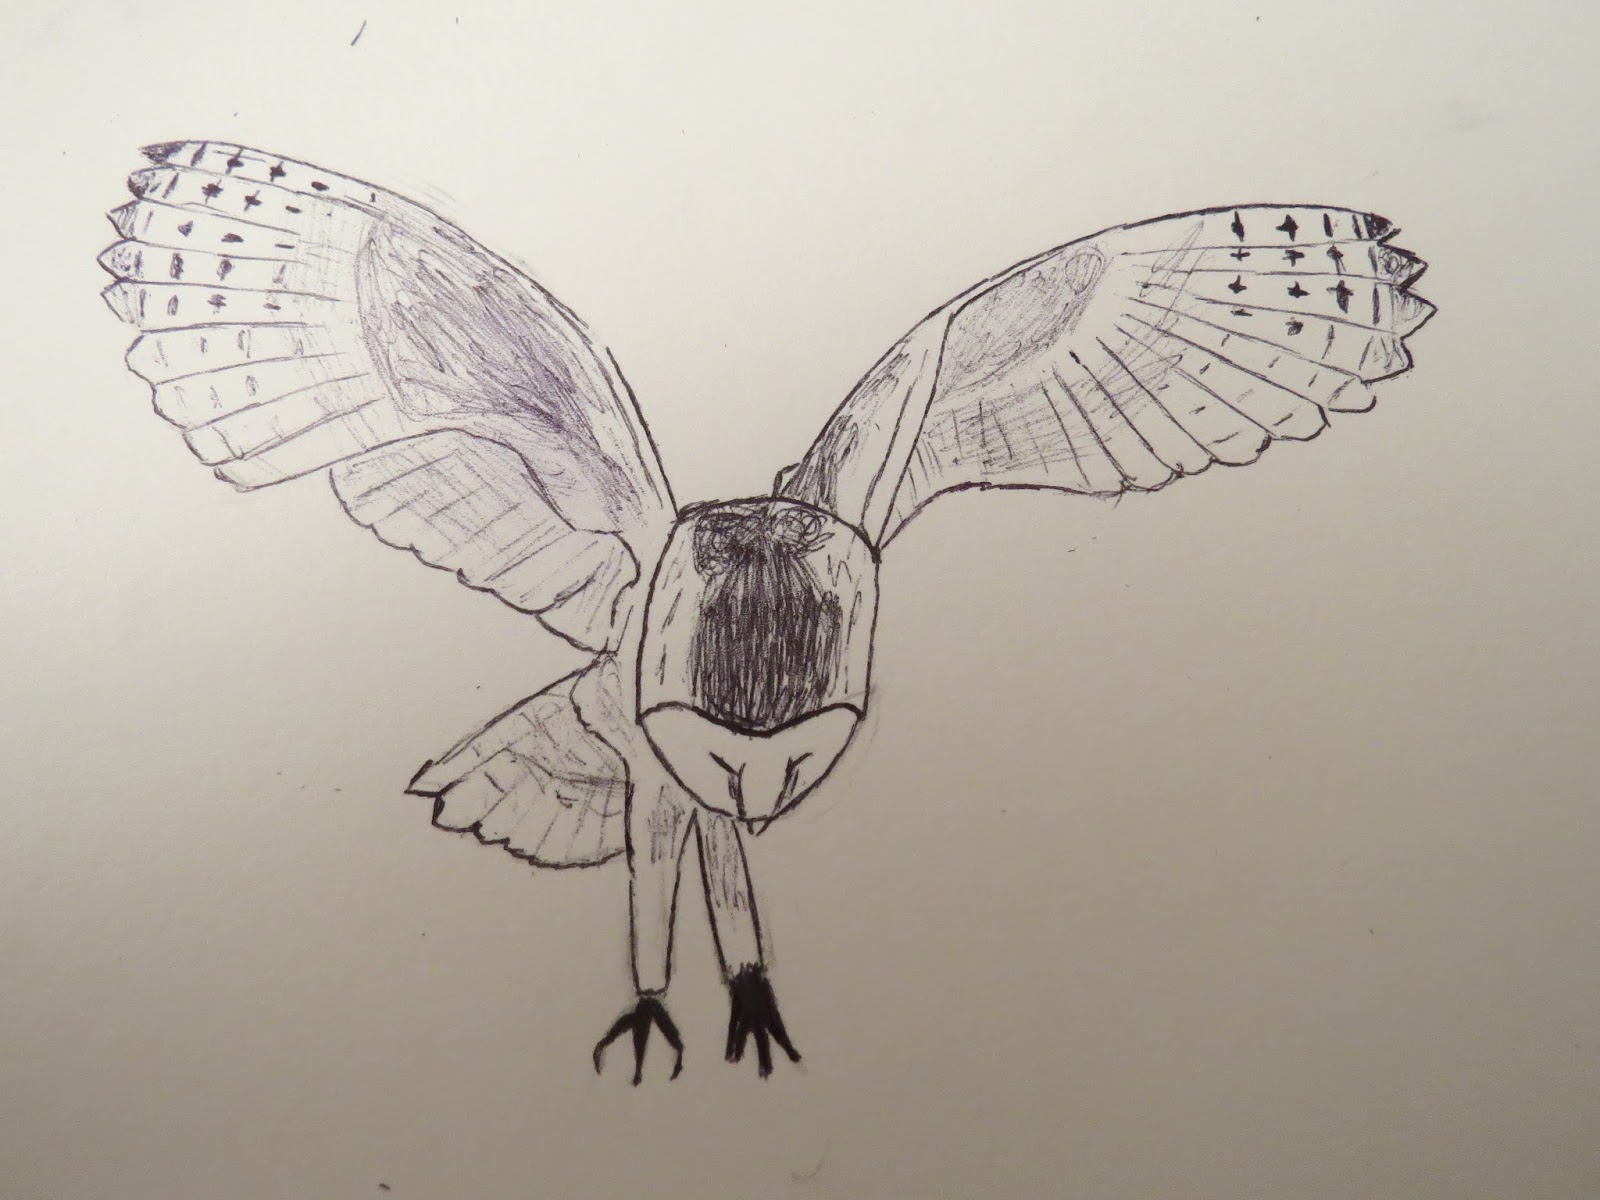
| Stage One |
When owls fly, they appear ghost-like floating over the countryside. They hover silently, peering down for pretential prey, listening out for them with their acute hearing. To draw a hunting owl, draw a circle for the head, rectangles for legs with circles for talons. The wings are created with a series of round shapes, large ones for the spread out primary feathers and smaller ones for secondary feathers. For more information on how to draw wings and for other flight positions, read my How To Draw: Birds in Flight post (click
here).
 |
| Stage Two |
At the bottom of the circle, draw a heart-shape for the face. Inside it, add lines for the bill and eyes (which are looking down). Shade in parts of the head and wings (especially the upper wings). The wings are divided up with lines radiating from the base at the top of the wing for the owl's primary feathers. Join up the ends of each line with a curve, more visible for the primaries and less so for the secondaries. Draw a wiggly line from one leg up to the top of the head for the body. Another wiggly line curves from it for the tail. Shade in lines for the talons.
 |
| Stage Three |
Redraw in pen, shading in the dark areas. Lightly shade in the shadows caused by the folding wing beats and add any pattern you can see on the wing's underside.
 |
| Stage Four |
Colour in your owl. The shadows on the white wings, etc are lightly shaded with grey.
I hope I have helped you out with this guide. If you need any more help feel free to message below. Remember, take your time and practice a lot. If you make a mistake, just rub it out and start again. You will get it right eventually. Until next time, good luck with your drawings!